9 Important Steps to Ensure Your Splash Pad is a Success!
Splash Pad Planning

Planning a splash pad can seem daunting, but when you have the right support teams, and a clear path to get from point A, to point B, it’s easier than you think!
This nine step planning guide will take you through the most important milestones in your splash pad project and get you on the right path for success. From creating a strong site plan, to assessing feasibility and gaining stakeholder input, to permits, opening days, ongoing maintenance, and keeping the space relevant for years to come—this guide and the Waterplay team have you covered.
STEP 1: Discovery + Site Planning
Start with the end in mind. We know, it’s a bit cliché, but only because it’s such good advice.
A great space is one that has a clear vision and involves the right people to make it happen, right from the start. That’s what we want to achieve in step 1, discovery and site planning.
Answer the questions:
- Why a splash pad? What brought you to this decision?
- What do you envision after opening day? How will this impact your community or business?
- What are some of the unique things about this project? About your community?
- Who will visit this space? Ages? Abilities? Families and caretakers? Community groups?
- How many people do you expect to visit the play space daily? How many months per year will the space be open?
- What do you want people to experience here?
- What are some goals that you have beyond people and play? Consider sustainability goals, inclusivity, etc.
- Who are my stakeholders? What will make this project a success for them?
Knowing and clearly identifying your motivations and the needs of the kids and families that will be playing in the splash pad will help you create a list of important goals that you’re not willing to negotiate on and select the right play elements and supporting amenities. It also helps you create a solid plan that reduces unexpected discoveries or outcomes that may take you off the path to success or incur additional costs to the project you didn’t anticipate.
In this stage it’s also time to consider the partners you need to help you get to the end. Is theming important? Consider partnering with a creative manufacturer that has themed products that match your vision, experience in customization, and graphic design support. Will you have a lot of families visiting your space and staying for the day? Consider amenities that will keep them staying longer and coming back again, e.g., places to sit, toilets, changerooms and showers. Is building an inclusive space important to you? Ensure you select products that meet the needs of a diverse set of abilities and age ranges and work with a designer to ensure your space meets the level of accessibility and inclusion you need.
At this stage it’s also important to consider project management and funding, how will you get to the end, and how do you plan to pay for it? The good news is that there’s many options to explore for both:
Project management: While some municipalities and private businesses have project managers on staff, others choose to work with external aquatic engineering consultants who can help manage the scheduling, pre-planning, resource forecasting, project communications, and more.
Funding: Consider grants, fundraising, community builds, purchasing contracts, financing and phased installations* to support your funding goals.
*Phased installation allows you to break up your splash pad project into manageable phases that see additional splash equipment added to your space over time.
At Waterplay we’ve supported our partners through all of it. Contact our team for guidance on funding your project, as well as building onto your site as your budget and community needs grow. We’re happy to help.
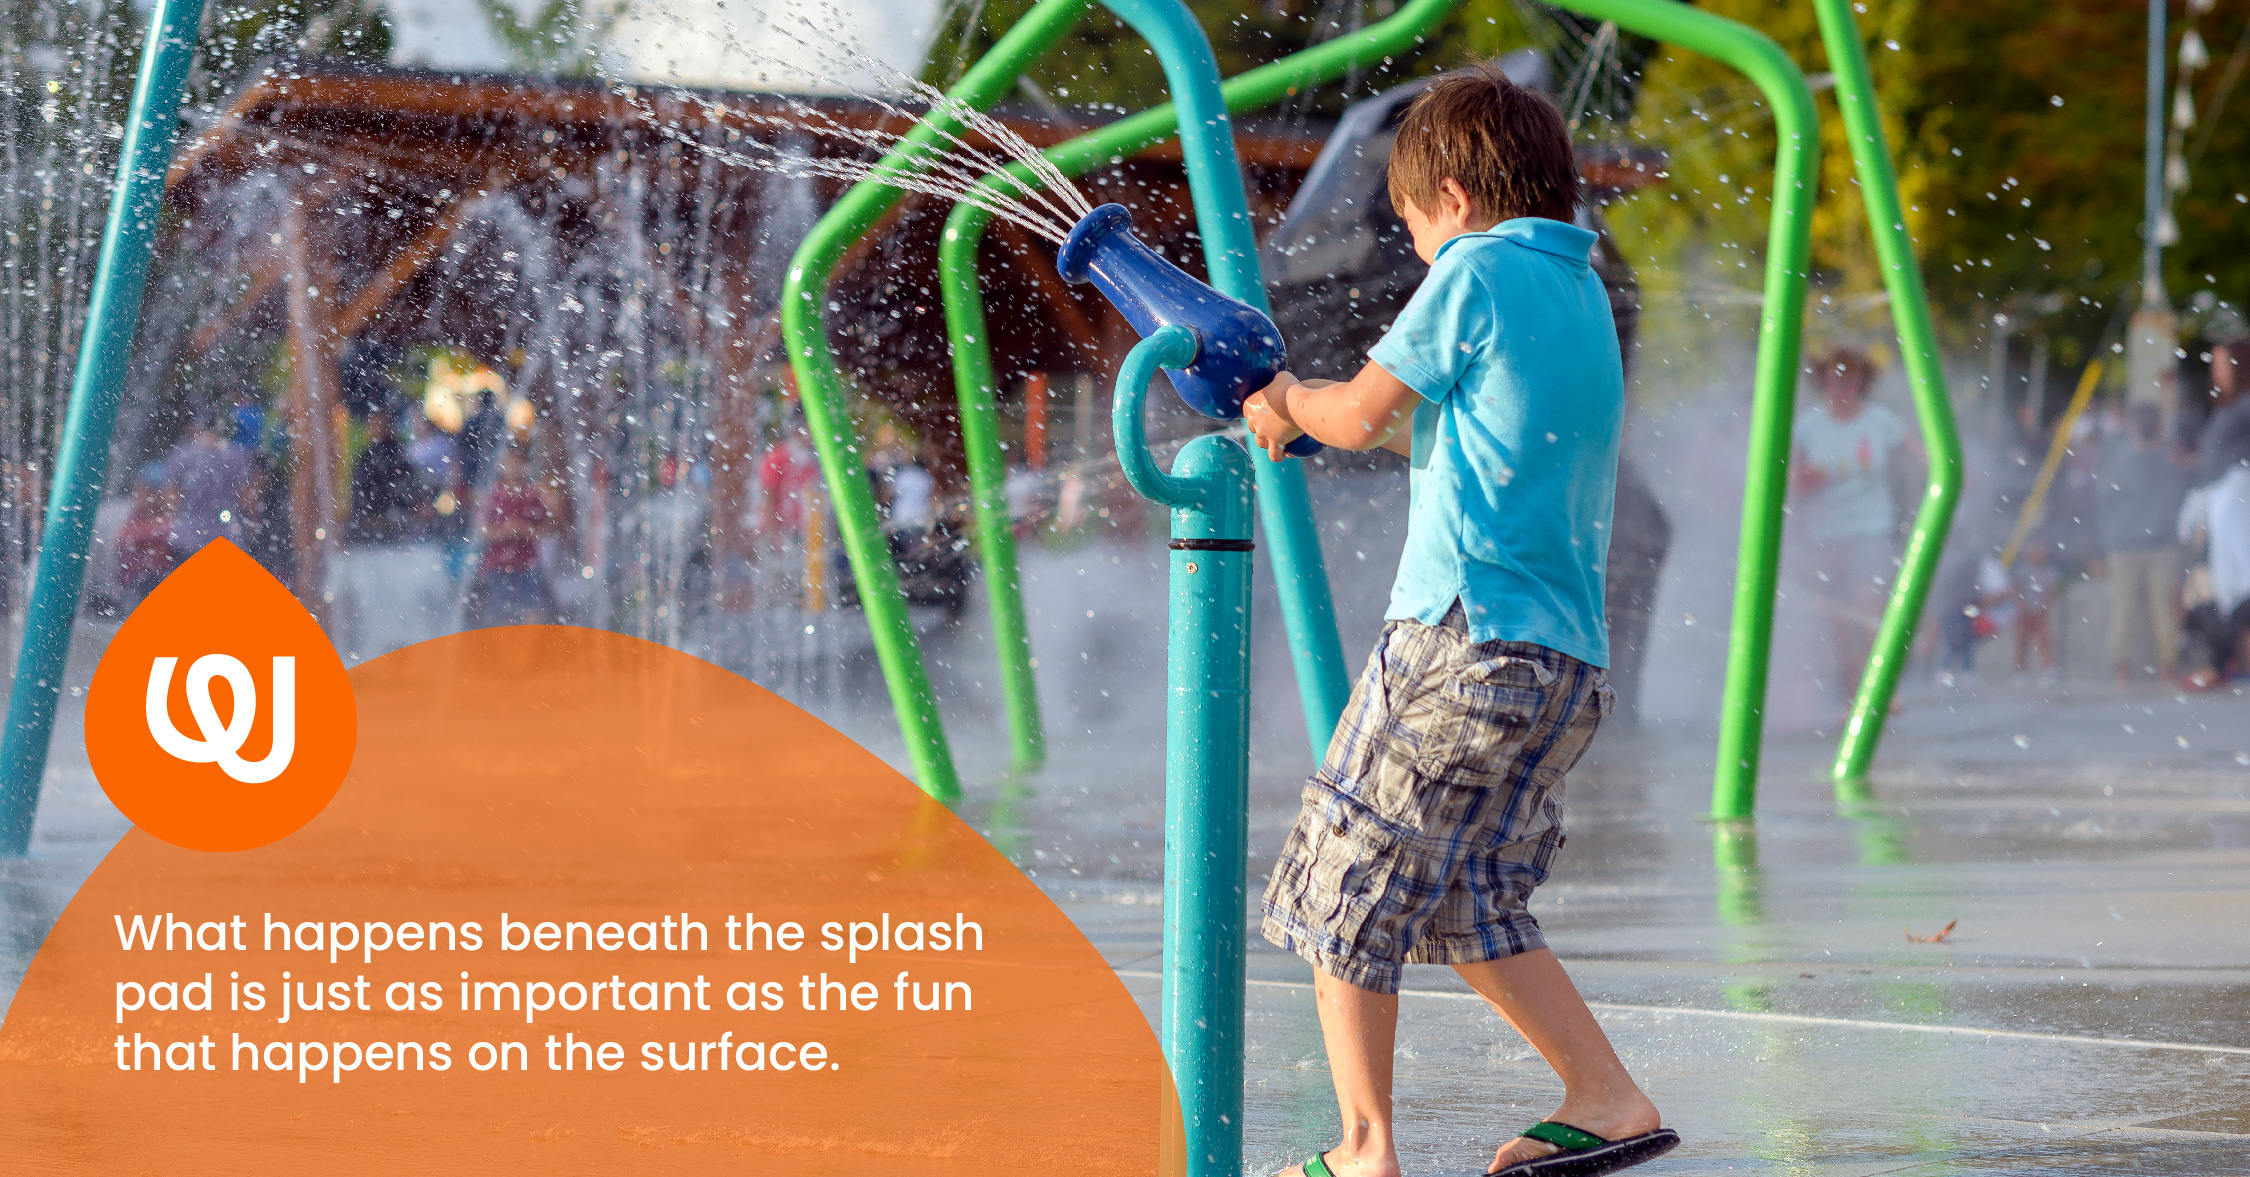
STEP 2: Site Evaluation + Water Management
Ok, you've done all the groundwork for your project. What's next?
Here’s where we start to test the plan. Take the goals you came up with in step one and deep dive into the site and surrounding infrastructure.
Some things you’ll need to consider:
- What is the space for the actual splash pad?
- Is the splash pad part of a larger project with multiple amenities or phases?
- Do you need to accommodate pathways or either existing or planned infrastructure?
- If your space is seasonal, what can you do in the offseason to make the space useable?
- Where is the water supply coming from for the splash pad?
- What water consumption rates should I expect?
- What type of water management system will help me achieve my goals: water treatment, flow-through, retain and repurpose?
Money Saving Tip: It’s here that you (literally) lay down the ground rules for your splash pad project, like the exact size of your splash pad. Make sure to include a splash zone at the edge of the concrete pad so the water doesn’t spray onto and potentially damage the surrounding landscape. A mistake that could require costly repairs. Also, don’t oversize your splash pad. Inactive concrete space is costly and eats into the budget for play features and amenities, it also reduces the play value of the entire space and unnecessarily increases the cost of materials for both concrete and below-grade piping.
Contact Waterplay to speak with our technical teams and learn about our exciting water management solutions designed for splash pads.
STEP 3: Stakeholder Input
You’ve got the plan, you’ve done a comprehensive site evaluation and are happy with the results, now it’s time to get stakeholder input and do a final sign off on the project vision and goals.
It’s here you’ll want to identify if you missed anything that will make the project a success in the eyes of the people using the space, or, if there’s anything you’ve added that’s not actually needed to satisfy the needs of the people that will be using the space. In this stage we’ve seen customers add a MASSIVE splash bucket because it was the one thing the community screamed for, or even adjust the layout to add more accessible experiences for nearby daycares that were hoping to use the space regularly.
Why now? Why wouldn’t we do this sooner? Good question. In our experience it’s easier to get feedback when you bring a clear vision to stakeholders so they have something to provide feedback on. If you ask for feedback too early you might get feedback so wildly different that it’s impossible to make a cohesive plan from it. Know your goals, assess the site, then get the feedback. At this stage you’ll be better able to evaluate and prioritize the input you receive and get the project rolling.
Important things to note in this step:
- Clearly present your vision, goals and site findings so your stakeholders can see the full picture.
- Don’t disregard feedback, remember, your stakeholders are key to your success.
Working on a private splash pad project? Talk to our teams about creating spaces that attract new and repeat customers and let us share some exciting projects we’ve worked on with customers who have seen attendance skyrocket by adding splash play to their amenity offerings.
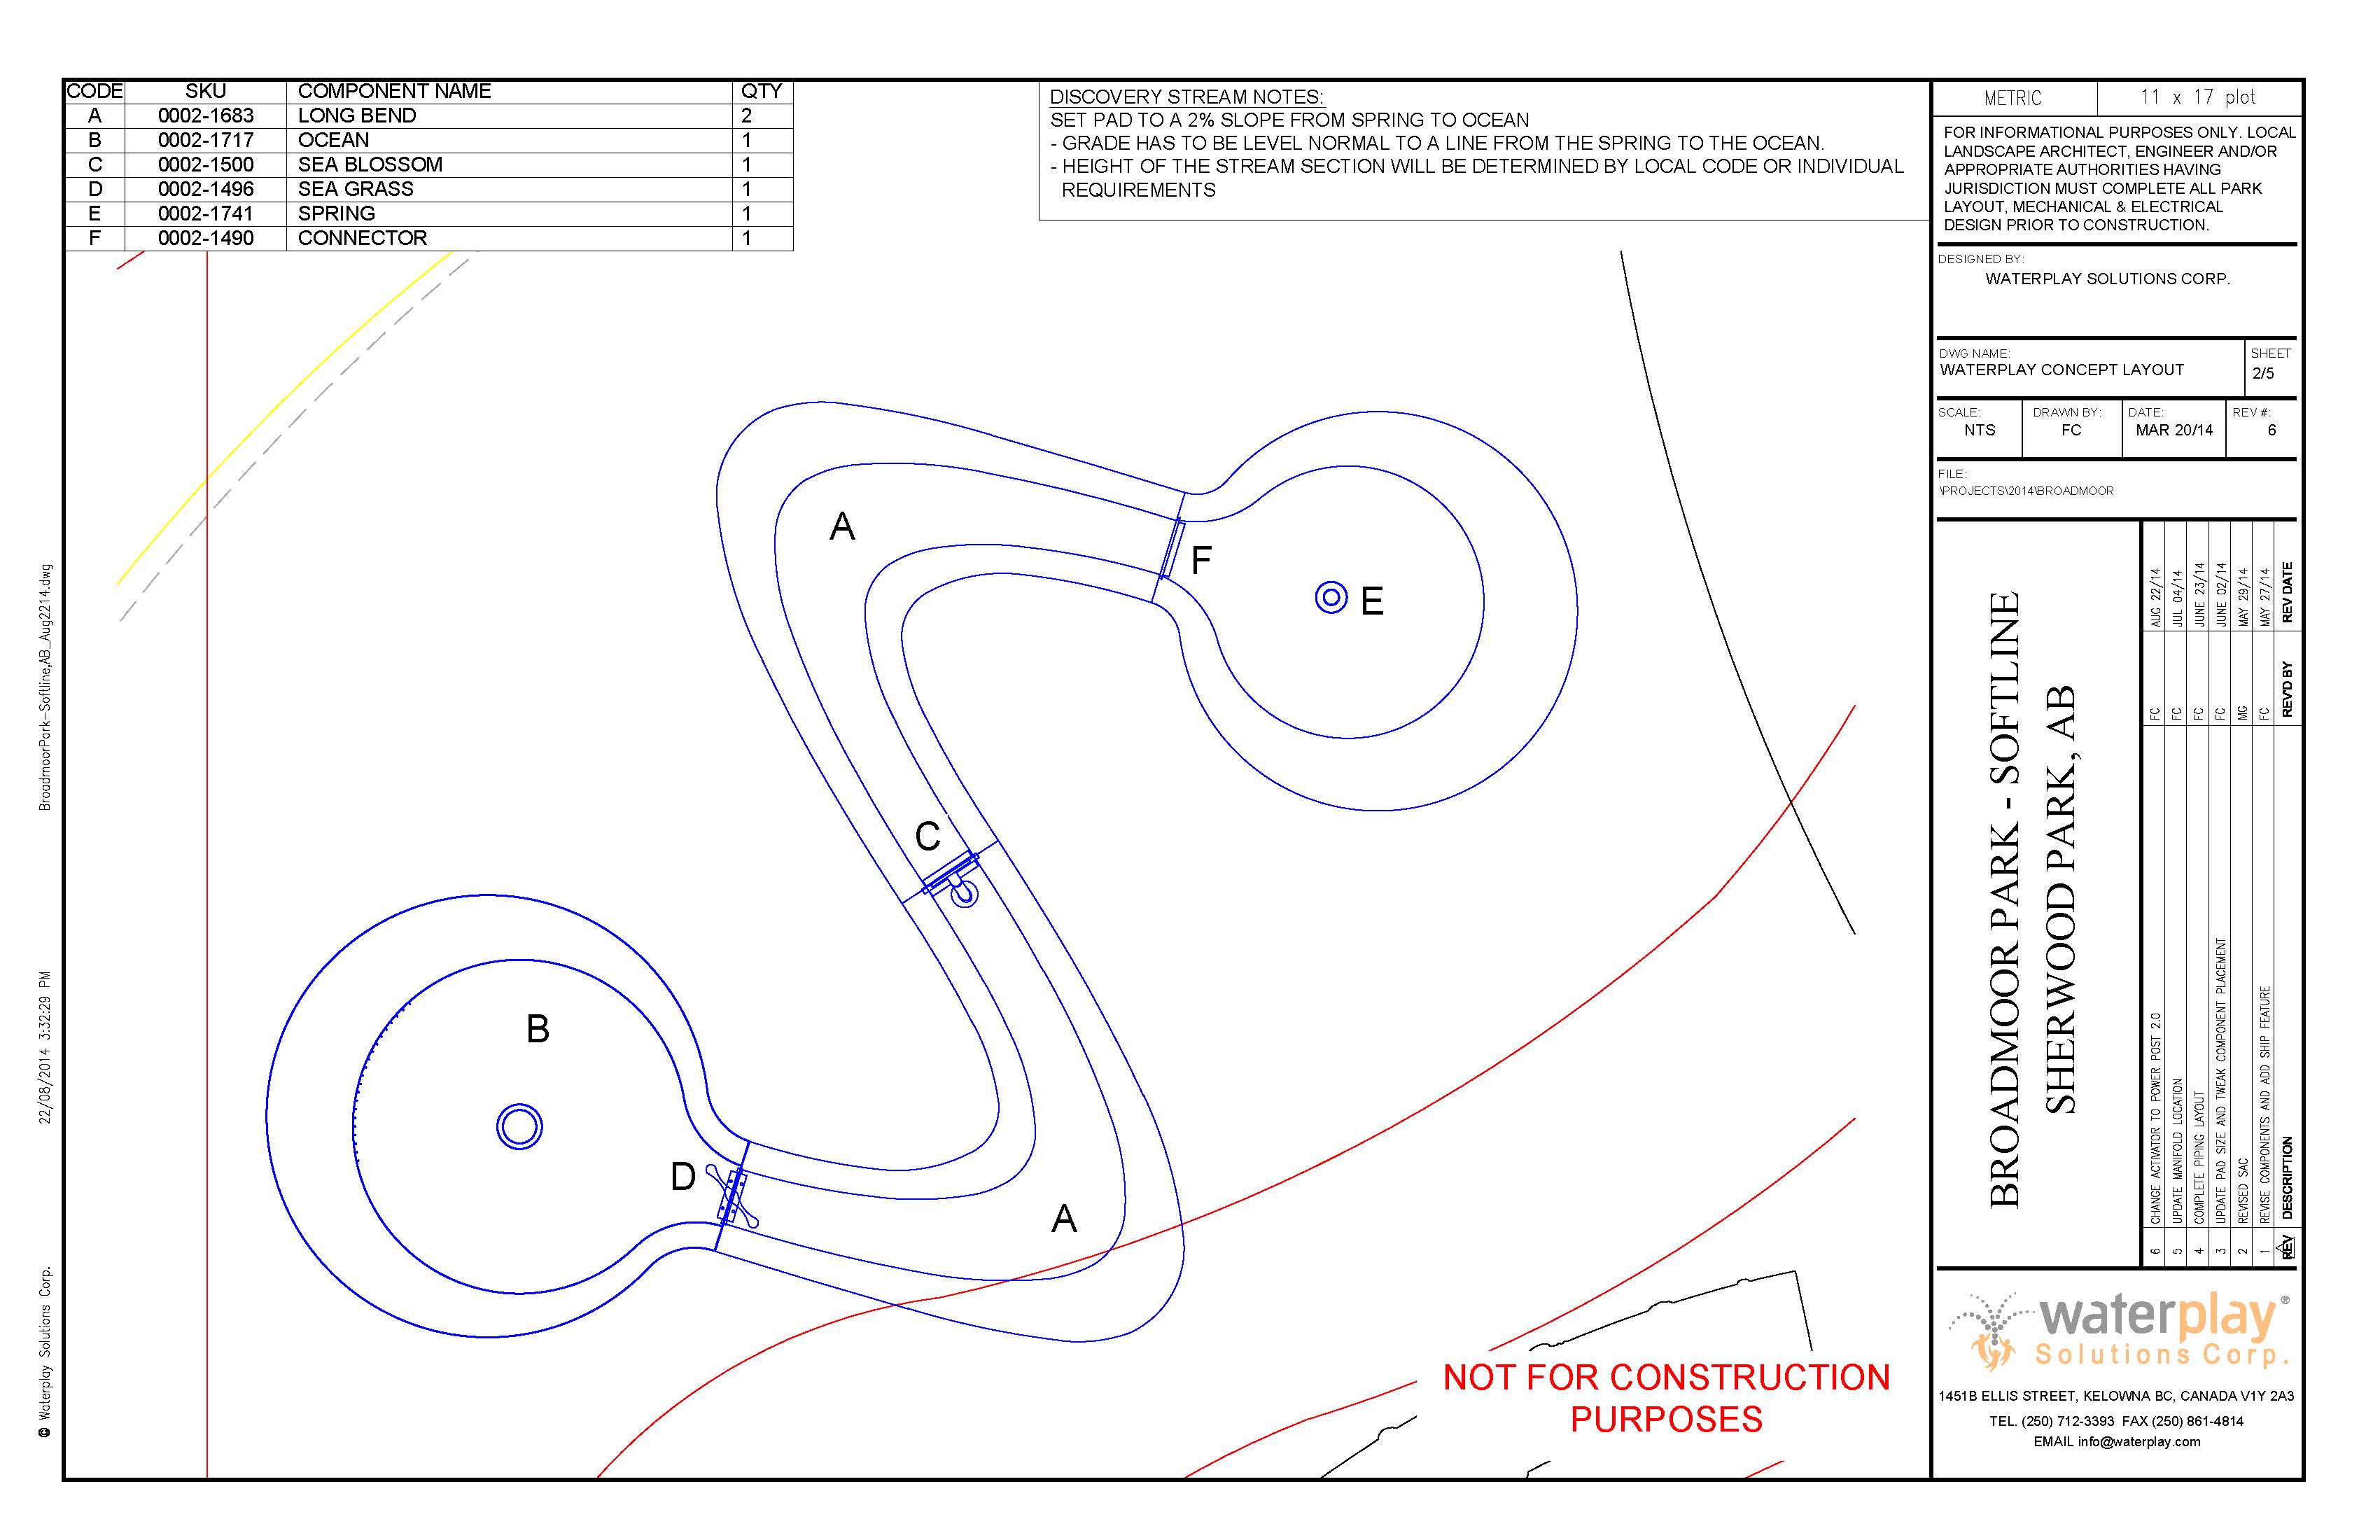
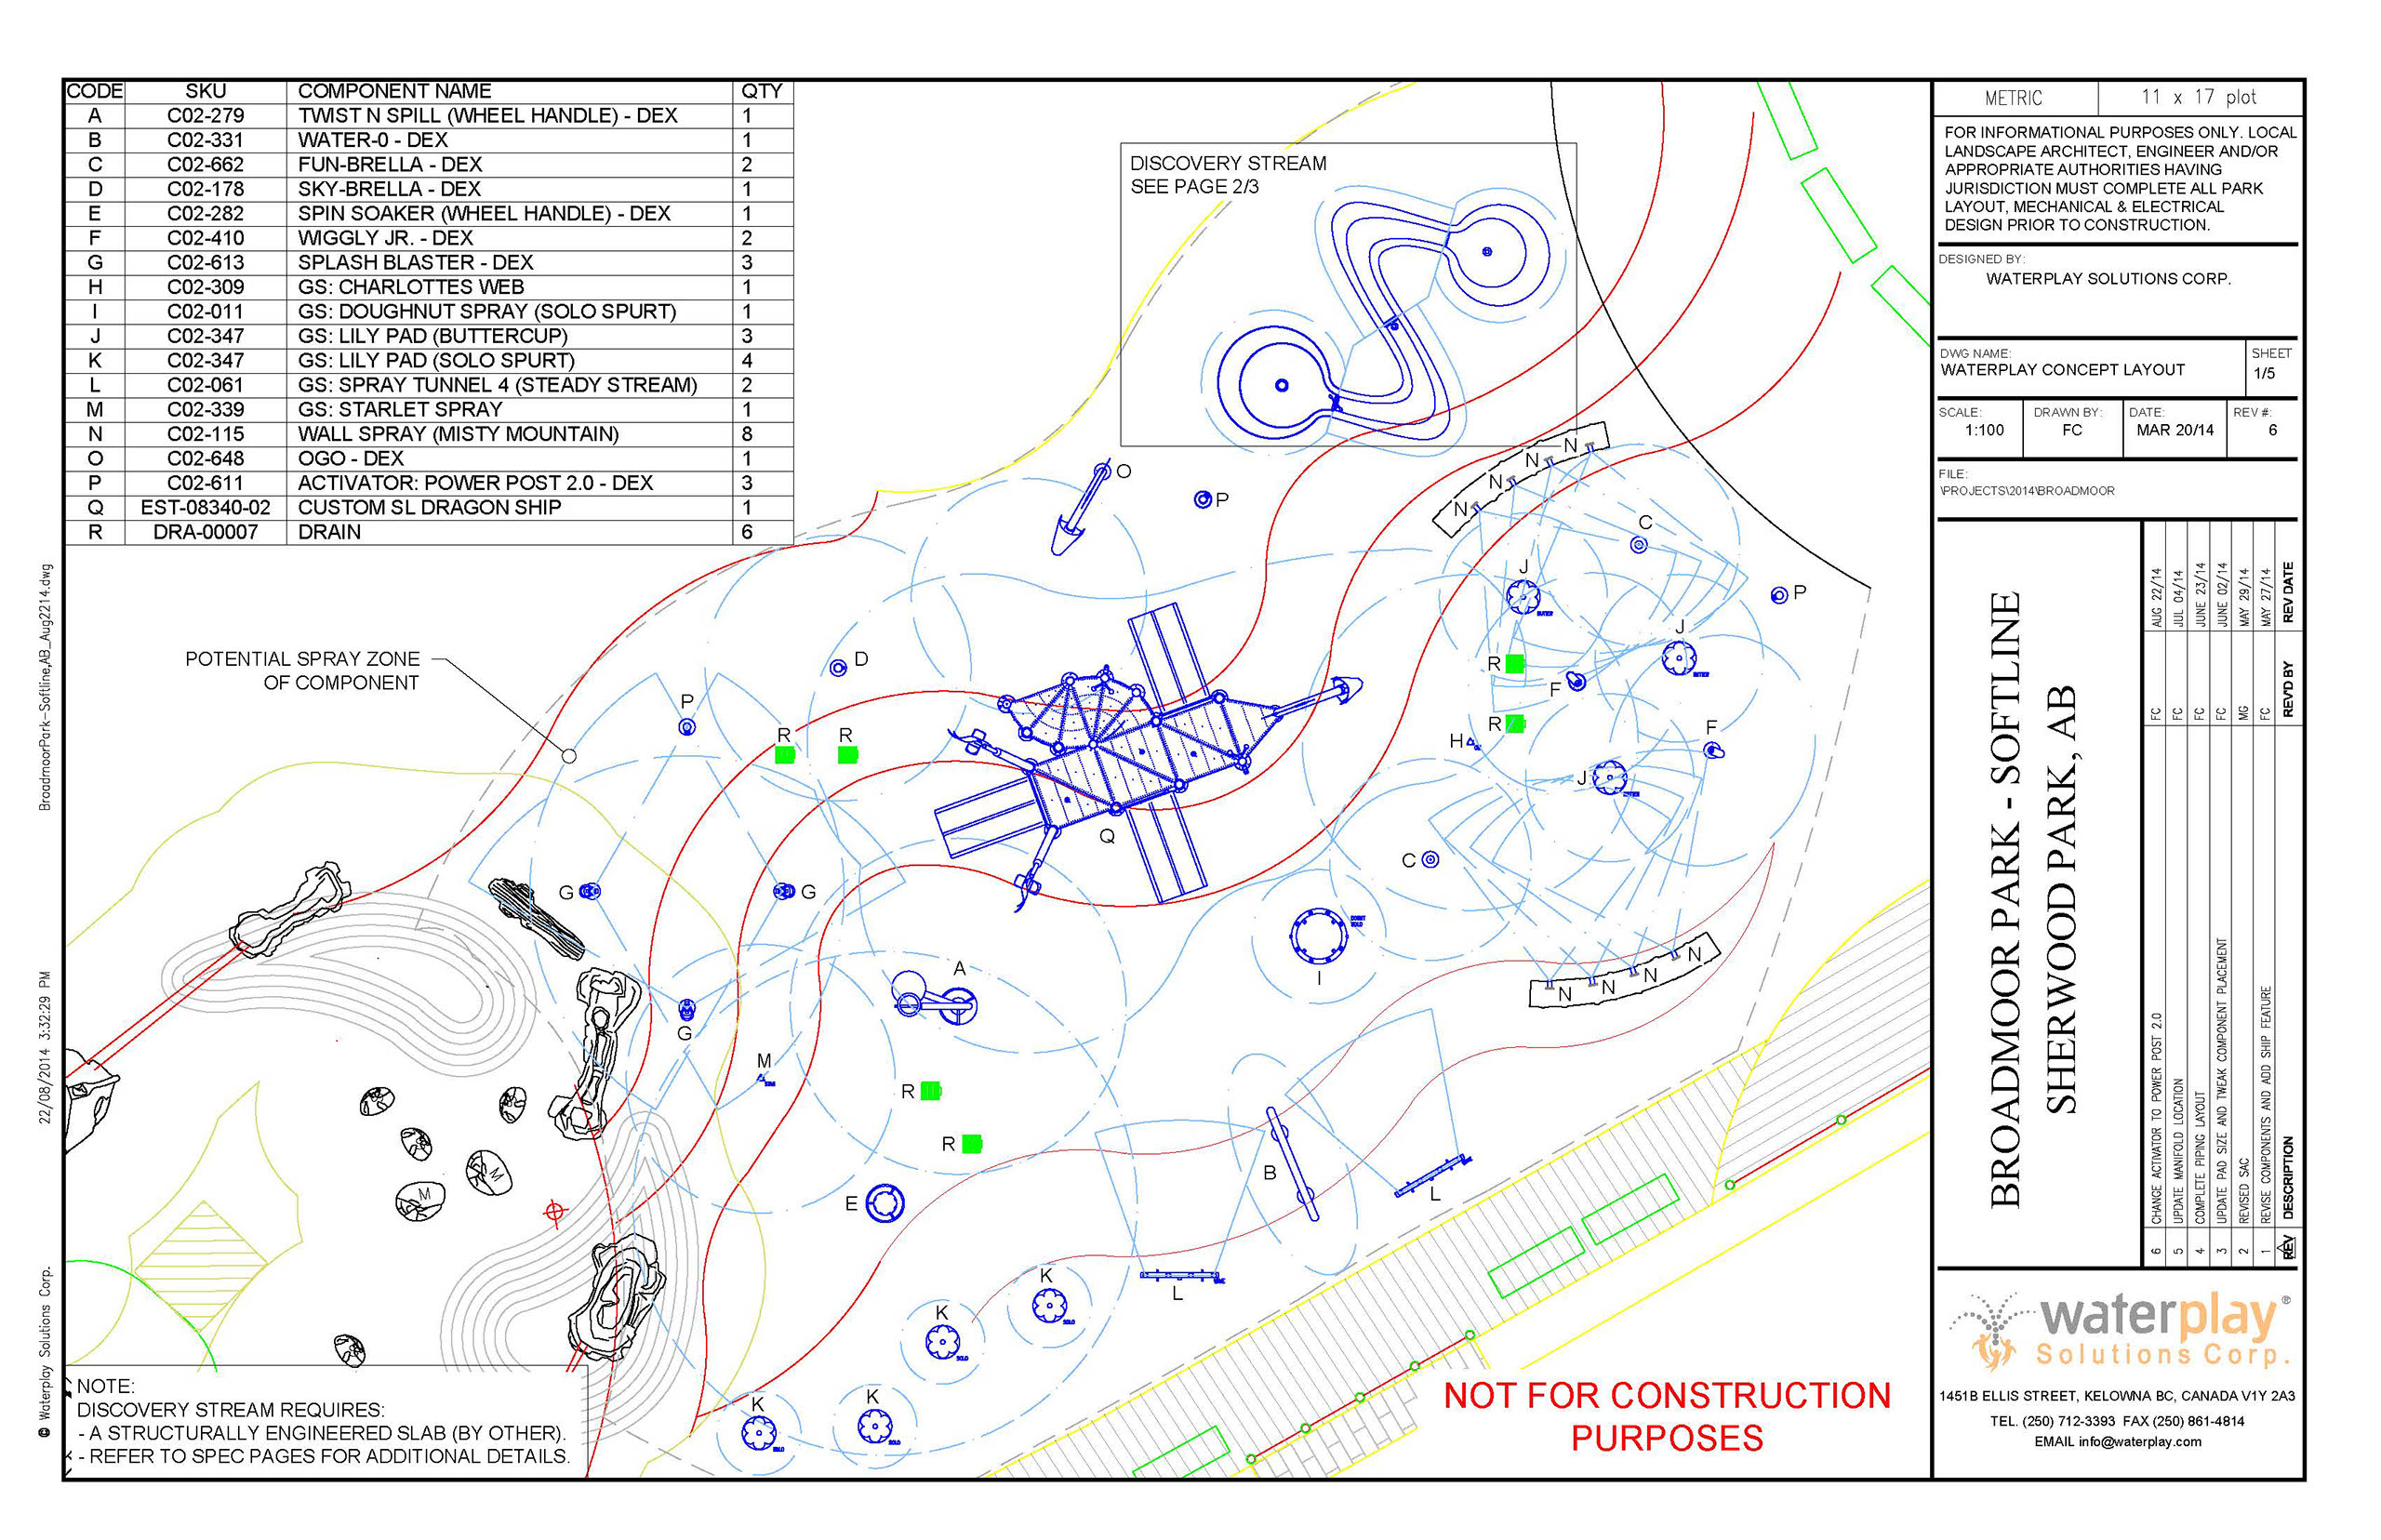
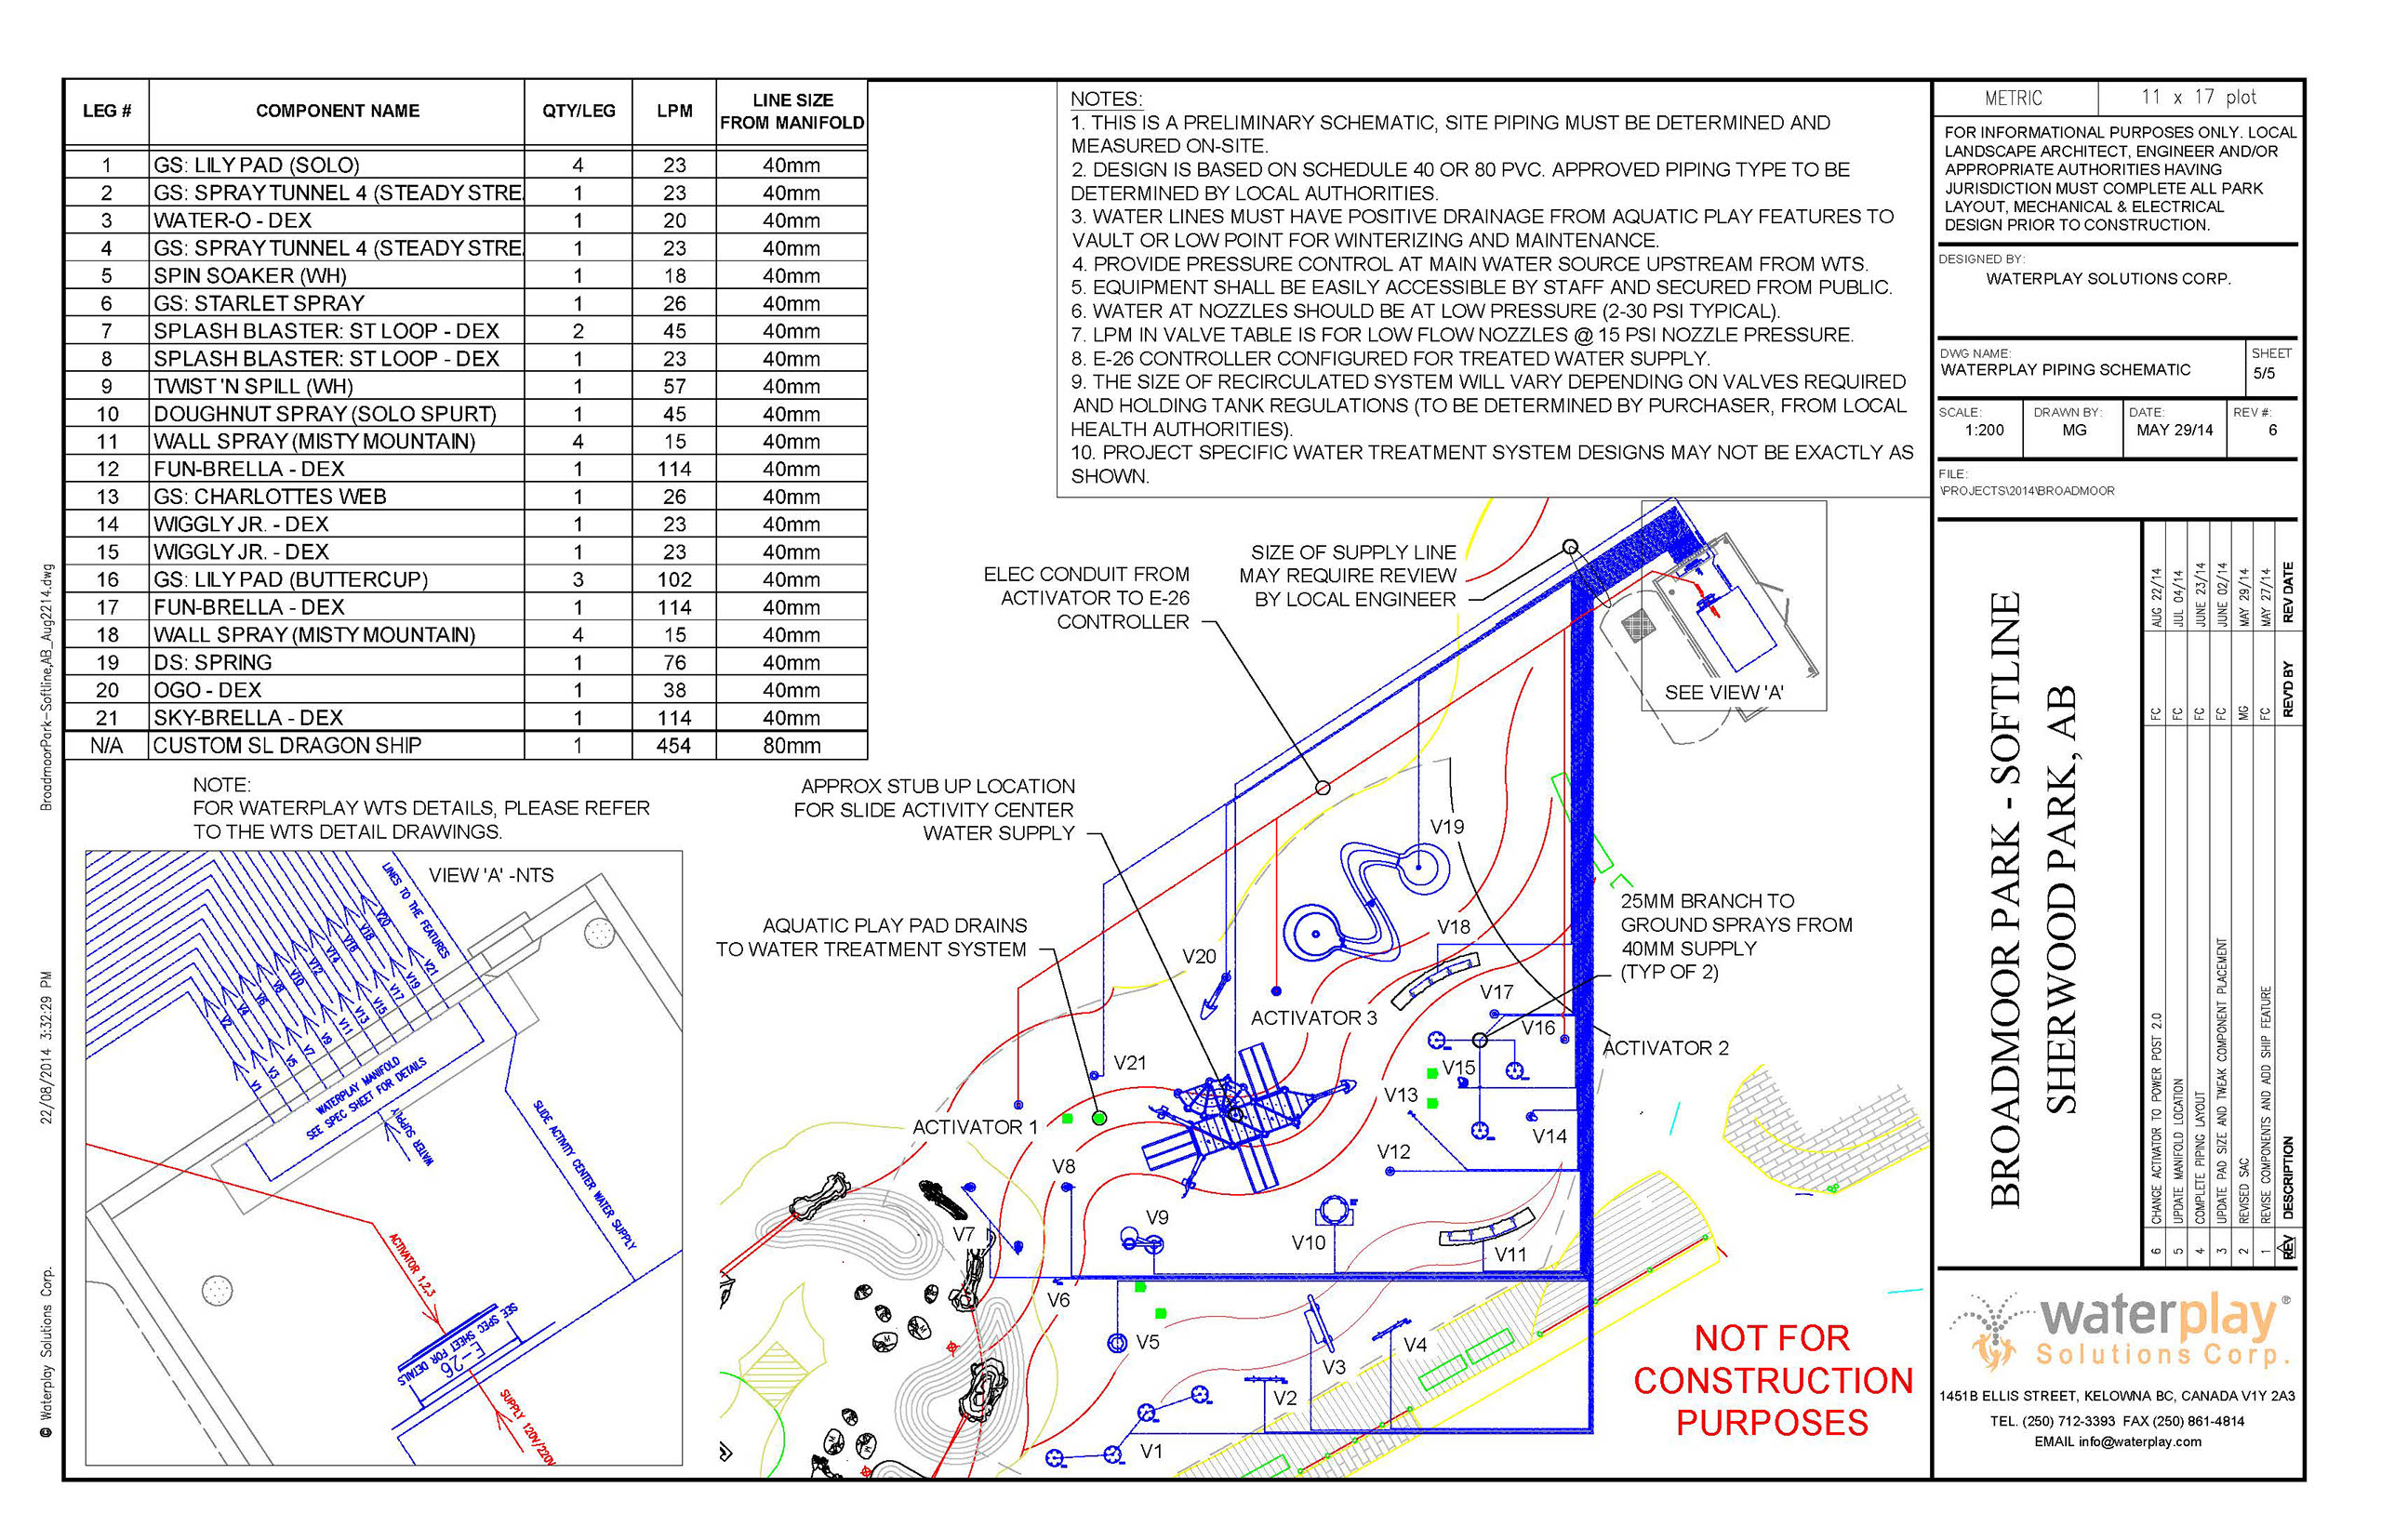
STEP 4: Project Drawings
It’s time to put the plan in motion. The first step is detailed project drawings that create a visual representation of the required components for your splash pad. Your drawings should clearly illustrate and define:
- Overall layout – size and shape.
- Placement of splash play feature elements.
- Spray radius and flow rates of each feature.
- Piping schematics.
- Future phasing (if working on a phased project design).
Work with an experienced team of professionals like the Waterplay Project Support team to ensure that every detail is carefully considered in the layout of your project. Mistakes or lack of consideration during this step can lead to costly repairs discovered during installation or even years down the road. Choosing a manufacturing partner with experience and a high level of expertise is key.
STEP 5: Permits + Approvals
Now that you have project drawings, engage with your local health authority to understand the specialized health code regulations for your splash pad. This will save you time and money when applying for permits and expedite the approval process.
It is also crucial to identify the necessary city or state/province building permits that will be required for the installation phase of your aquatic project.
Remember in step one where we discussed project management? Having an aquatic engineering consultant on hand during this step can help you move through this stage quickly. They’ve done this before, successfully, many times. Rely on their expertise.
STEP 6: Public Tender + Award
In some cases, on public projects, the equipment and services needed for a splash pad or aquatic facility will be contracted through a competitive bidding process, whereby a request for proposal (RFP) is extended to potential suppliers and aquatics manufacturers. Through this procurement process, the contract is awarded to the most preferable proposal.
If this applies to you let us help! We have a team of dedicated resources in place to help you respond to the RFP and work with many purchasing cooperatives to assist with contract procurement.
To learn more about our current government purchasing contracts, click here. Memberships are free!
STEP 7: Installation
You've thoroughly planned and signed off on all matters related to your splash pad. It’s time to break ground. This is super exciting and, for many of our customers, a bit daunting. What if things don’t go as planned? What if I made a mistake somewhere along the line in planning? What if the partners I choose don’t pull through and deliver what they said they would? Truth bomb? All these things can happen.
Minimize risks by choosing the right installation partners with experience in splash pad installation.
When choosing partners, you should consider:
- Expertise and experience: How long has the company been in business and what have been the outcomes of past splash pad projects?
- References: What do past customers have to say about their work? What is their depth of experience?
- Support: What is the process if things go wrong? How will they support the solution?
Bottom line, if you partner with reputable, experienced partners, you’ll know that whatever happens, you’ll be in good hands. Contact us for more information about how to choose the right partner for installation and construction. We’re happy to recommend our proven partners or ensure you’re armed with the information you need to make the right decision.
STEP 8: Opening Day!
So much has gone into building your splash pad and now it’s time to celebrate.
But it’s not just a celebration, opening day is so much more! For municipal park spaces it’s a chance to give back to your community with a space where they can connect and find joy, also attracting tourists or newcomers to the community. For urban spaces, aquatic facilities, housing developments and private businesses, it’s a chance to promote your amenity offerings and encourage more visitors.
Don’t skimp out on opening day. Invite the community or your customers and show them the amazing space you created for them.
Check out our opening day checklist:
- Invite the community and your customers with enough time for them to commit and make plans—this will ensure you’ll have a well attended event.
- Engage the media to help promote the park opening for added exposure.
- Be realistic about the day you choose for the event. Too often splash pad openings are planned and then the date moves due to a delay on the project. Opening day doesn’t need to align with the first day the park is open to the public. Choose a date that ensures the space will be ready and you’ll be prepared to host a fun day.
- Plan giveaways and make it a big event – your partners can help with this and will enjoy the promotion alongside you. The Waterplay Sales team loves to attend grand openings and always brings some swag and excitement to the day. Let us know how we can support you.
Use social media and your website to continue the promotion of your splash pad leading up to, and after opening day. The most successful splash pads are the ones that people know about, both in your community and those visiting. It’s amazing how many people you meet at the splash pad who drove from across town, a neighbouring city, or even planned their vacation because of the local amenities for families.
Splash pads make communities better. Spread the word!
STEP 9: Ongoing Maintenance + Revitalizations
To keep your splash pad looking great and safe for play, rely on our product support teams for guides, seasonal checklists, and expert help. Available to support you at any time, spring, summer, fall and winter, Waterplay has the best support team in the biz to help you with service questions, parts orders, revitalizations, and more.
Need Help With Your Project?
Work with us! Let our highly skilled team of aquatic play experts seamlessly guide you through the process of planning, designing and installing your very own community splash pad or spray park. We're here to help you every step of the way - let's get started on your project!
Contact Our Team Today!